
In my last post I described the events that comprised My Quest for the Perfect Budgeting App. Spoiler alert: that quest resulted in me creating and writing my own budgeting app. Writing an entirely new app may be daunting for some, but for me it was a foray into a vast green field of development; an open canvas if you will. I was excited by this prospect, because creating things is in my nature and it is something I enjoy.
Now mind you, creating your own app is a big endeavor. This is something that entire teams ordinarily do, so taking it on oneself to do means take the number of hours for each person’s contribution times the number of people, and that’s how many hours it is going to take you. When you think about what goes into making an app, from the time you identify it as a solution to a problem, to the time you actually start using it to solve that problem, there are several phases and many, many steps.
Peeling back the layers
In my previous post, I mentioned that I had spent several years toying with the idea of turning my Excel method of budgeting into a streamlined app, and over that time I slowly conjured up ideas about the user interface of such an app and how it would mimic what I was already doing in Excel. The first time I actually penned these ideas to a physical sheet of paper, one, I had a decent idea of the direction I wanted to go with the app, but two, I saw just how large it was going to be. To pull this off, I was going to need to break this down into a backbone with individual features as limbs. I was going to need to determine which technologies I was going to employ. I needed to figure out how I was going to store data, and how I would map it (read: schema). And that was just the planning aspect of it. This would have to be followed by building the backbone, the database, and then each feature on top of it. This would be followed by testing it. And finally, once that actually worked, then I could actually start using the thing.
Because of how large this endeavor was, it took me two different iterations of trying to actually accomplish this. I mentioned in my last post that the first time I tried to pull this off was about four years earlier in 2014 right after my son was born. I was on paternity leave from work and I had this idea that I might actually have time to make this happen. And it started that way… but having a newborn is no joke, and is a test of your endurance and will. However, I did make a little progress, and I’ll tell you about that…
But first, I’ll tell you about where I was technology-wise at the time. As a computer engineering (and electrical engineering) major at North Carolina State University in 2010, we didn’t spend a lot of time talking about web protocols and web development. That was more Computer Science’s speed. I’ll admit, as a college student, I didn’t know much about how the web really worked. I knew about web servers like Apache HTTPD serving static web content. But it wasn’t until graduate school in 2011 that I learned about dynamic serving from things like CGI, and I thought that was really cool. My summer internship with IBM in 2012 was where I taught myself JavaScript (which was truthfully easy coming from Java) and the WebSphere Application Server. I built web tools that engineers within IBM (and eventually me as a product engineer) used for customer hardware problem analysis. WebSphere + Java was a cool combination to me, with its JSP and Servlets, because it did what CGI does but built into the framework. WebSphere is also an expensive product, and bigger than anything I would need for a home brewed project, so Apache Tomcat is what I used in place of WebSphere when tinkering at home.
if (at first you don’t succeed)…
My first pass at the budgeting app was to use Java and J2EE in Tomcat to do all of my web application serving and processing. For a database, I would use MySQL, and I thought it would be good to employ an ORM, so I threw Hibernate into to the mix. And all of this was done in my happy place at the time, the Eclipse IDE.
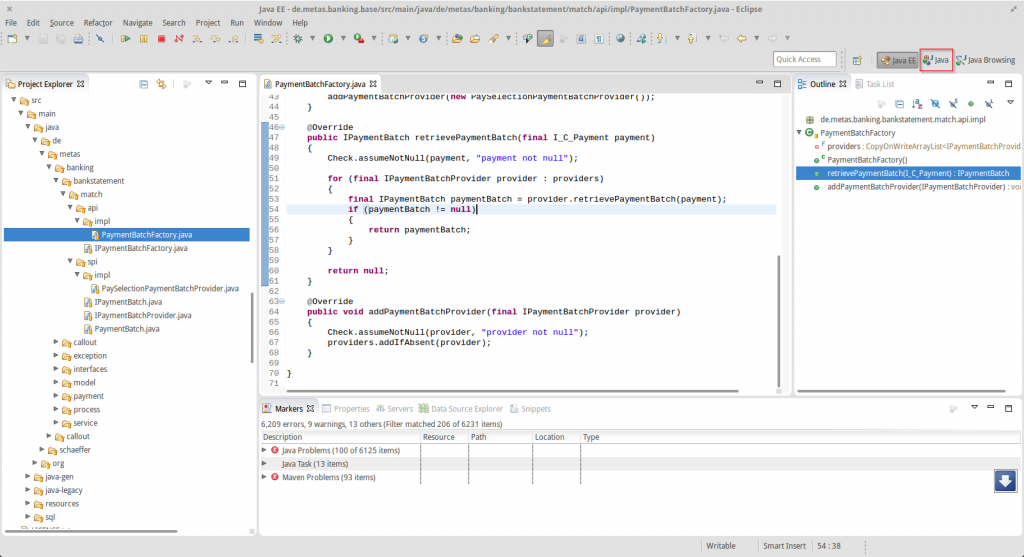
I owned a computer that I used as a server and I would host the web application on that server. I decided on Java because it was the one language I was most familiar with, and I didn’t necessarily have time to learn a completely new technology and framework. I had to get to business! Speaking of time though, I quickly learned that out of the box, Hibernate ORM was so slow! I loved the idea of an ORM… Storing serialized objects as rows in a table, where each object’s field represents a column in a table, and non-primitive types are just foreign keys to other tables representing other objects. Not having to write every SELECT, INSERT and UPDATE query seemed like the dream! But I just couldn’t get it to work. Performing an ORM fetch took at least ten times longer than writing a SELECT query and manually iterating over the result set and mapping it to objects. Listen, I’m sure there are those of you out there who know how to tune an ORM like Hibernate, but I wasn’t pulling mass amounts of data. Maybe tens of rows! At times only barely over 100! Since time was not on my side, I had to be very judicious about how I was going to spend it. Do I go down the rabbit hole of figuring out how to increase Hibernate ORM’s performance so my code is a lot easier to write? Or do I just write the manual queries and mapping because I knew how to do that and it performs much faster?
Well it didn’t matter anyway because I didn’t make it far before I just couldn’t devote the time to it. I did end up writing some code, but retrospectively, I started on the wrong component. After I created the database schema and did the Hibernate ORM mapping to my object-oriented model, I went straight for the automatic transaction categorizing feature.
I didn’t even go into depth on a backend web application framework, like Spring MVC which was popular at the time, nor did I consider using a front end framework. I figured I would just write all of my front end code from scratch, and not rely on a framework. Years later having finally finished the app and definitely used a front end framework, this was naive of me. It took long enough to finish the app even when someone else had down all of the hard work to actually create the meat of the front end framework. I will admit though that I had been somewhat jaded by the use of any “framework” in general. Let me tell you what. Now, in the year 2019, documentation has come a long way for web technologies and the content about using them on sites like Stack Overflow. But between 2012 and 2014, when you were learning a framework, but something didn’t work quite right, it was tough to figure out why. It is possible that a lot of that had to do with my lack of professional experience in the web development world. But I experienced issues with frameworks like Spring MVC, the Dojo Toolkit, and more recently with Hibernate ORM. Ordinarily when I ran into something not working, I would dig deep into the code to find out exactly what was breaking or not working right. Up until my life in the professional world, this method of problem solving always worked for me because all of the code was mine. I was used to writing things from scratch. It was a good way to learn, but it was inefficient in terms of development time. When using a framework, digging deep into the code wasn’t usually an option, as the “code” was nothing more than a binary or an obfuscated JavaScript minification. Post 2014, I learned to rely on different frameworks as powerful aids to speed up development, and have been fortunate to reap the benefits of through documentation and community sourced insights on sites like Stack Overflow.
…try { try { again() } }
I went through a period where I just thought it wasn’t going to happen, having attempted to delve into the task of creating a personal budgeting app and seeing just how large the effort was. During this period, I tried really hard to make other budgeting apps work, and I learned a bit what features were really important to me. In this time I had been exposed to other technologies, like C#, NodeJS, and I even had to write C++ for work too. In the four years between my first attempt and what would become my second attempt at writing a budgeting app, I got to a point where I was fed up with my inability to properly track my finances and that there were no apps out there to properly fit my budgeting system. This was enough to drive me to giving it a second chance, but I decided I would take a different approach this time.

I was skeptical at first, but I eventually embraced Visual Studio Code as my IDE of choice. This was mainly because JavaScript became my coding language of choice. JavaScript? Are you kidding me? Are you nuts?? I think we can all say now in 2019 that JavaScript has come a loooong way since the days of JavaScript in the browser in the early 2000’s (and, well in the 1990’s too). Especially with the adoption of Node.js over the past several years, JavaScript has gone through many language enhancements and has a vast community. What really drew me into JavaScript was just how rapidly I could develop from nothing. My speed of development in JavaScript was leaps and bounds faster than in Java, which up to this point had been my language of choice. Not to mention that since Node.js utilizes the V8 JavaScript engine, much of the logic that I can do in Node.js I can also do in the Console tab of the Developer Tools in Google Chrome.
You see, in the past, in my Java days, when I wanted to tinker around with some computation or parsing logic, there were a lot of steps to go through in Eclipse to make that happen. Here are some example use cases:
- Parsing every line of a large text file and outputting just the 10 lines before and after every line that had text matching a certain regex
- Generating a bitmap image file of pure random noise, in black and white, greyscale, and color
- Taking a small monochromatic image and generating a 32-bit unsigned integer array declaration in C for use in regenerating that image on a display in an embedded system
Yes, there are different tools I could install to do each one of these tasks, but I found it to be a faster turnaround to just code this up in Java and run it. However, every time I wanted to do a task like this, I had to create a new project in Eclipse (or find an existing scratch pad project), create a whole new Java file (and come up with a name for it – why is naming things so hard??), write up all the code, change the project’s run target to the new Java class I just coded, and then run it. Once I became proficient at ES6 (and beyond) JavaScript, when I wanted to do many of these things, I just simply opened the Developer Tools’ Console tab and just stared writing away. No projects, no naming files, no changing project run targets. Admittedly, that was just for testing logic (which I did frequently with text parsing). I did still have to use Node.js for any file system IO operations, but even that has an REPL interpreter that I can whip out and quickly plug away with.
The fact is, JavaScript was my obvious choice for my language of development, and there were a few reasons for this.
- I used it regularly at work and was very familiar with it. There was no ramp up time learning a new language to get started with my app.
- Unlike Java, JavaScript is weakly typed. Is this dangerous? Well, consider a machete. That’s dangerous if you aren’t using it properly. But if you adhere to a set of rules, you’ll find yourself not getting into trouble with it all too often, and it is very efficient at its job. Not having to declare a variable’s type every single time simply speeds up development. This is true when I am doing sporadic object declaration. I don’t need to write up a class definition first and set the return type of a function to that class. I also don’t have to use
instanceofevery time I return anonymous objects. I create an object on the spot, and on the receiving side, I can simply determineif (object.property)to determine if that object has that property orif (object.hasOwnProperty('property')if I want to be extra safe and explicit. People like TypeScript as an enhancement to JavaScript that adds strong typing, and I admit that I can see the merit, but I find properly keeping up with typings to be a hassle. Even if I didn’t think that was a hassle, for me personally I have found that I spend less time writing weakly typed code and having to debug the occasional typo that a strongly typed compiler would’ve caught than I would spend writing strongly typed code and having to declare all of my types and object/class definitions. - JavaScript is a very concise language. At least ES6 and beyond are. I can do a lot with very little syntax. Java is very verbose. Consider a line like this in Java:
HashMap<Integer, HashMap<String, CustomObject>> mapName = new HashMap<Integer, HashMap<String, CustomObject>>();
I probably picked the worst example for comparison, but it has definitely come up before. In JavaScript I would just write:mapName = {};
Now I get that they are not completely equivalent, and that I lose all type safety using JavaScript, but they are functionally equivalent for the purposes I need them for. Also, I will be forward and say that Java since version 7 does in fact have a diamond operator that significantly reduces down that first example I gave, but even reduced it still leaves a vast difference between what I need to type to accomplish the same (similar) thing in both languages. I will say that JavaScript is not the only concise language, and if conciseness was my only requirement, then I would’ve considered other languages like Ruby or Python that also are capable of doing a lot with very little syntax. - JavaScript has JSON and serialized data support. Again, I will admit that JavaScript is not the only language capable of this, but JSON is a first class citizen in JavaScript! It has both the
JSON.stringify()andJSON.parse()methods ready without any special imports! And JSON support is important when you are passing data back and forth between any backend and a frontend that is most likely going to be JavaScript. Let’s face it, JavaScript is the language of frontend web development, for better or for worse (I think for better given modern cross browser alignment and recent language enhancements). Yeah, there is Dart too, supported natively by Google Chrome, but let’s not hold our breath waiting for that to catch on. If you know you’re going to be dealing with JavaScript on the front end, JSON data serialization is an incredibly simple way to accomplish this, and JavaScript on the backend further simplifies this constraint.
To complete my JavaScript-machete analogy, this would make Java a pair of children’s scissors.

Image from https://www.topvaluereviews.net/sewing-crafts/kids-scissors/
Both are used for cutting. You can still cut through many things with children’s scissors if you are simply patient enough. Then again, you are much less likely to lose a digit with children’s scissors, so there is always a tradeoff to consider.
Java lovers, please don’t take this the wrong way. Java is a language that is still dear to me, and it is what I spent the first half of my career so far using. I am always happy to jump into some Java code, and I think its community support and libraries are very handy and important. Of course, after having used C# (which I believe is just Java, but done correctly) I now have my preferences for technologies other than Java.
Scoping out the scene
Having dived into JavaScript professionally, I was confident that using this language could help me build this quickly enough that this project wasn’t going to take forever. But what about everything else? How was I going to host this? What about my data persistence? How was I going to build the front end? What about the API between the front end and the back end? These were all things I needed to determine to get going on the project.
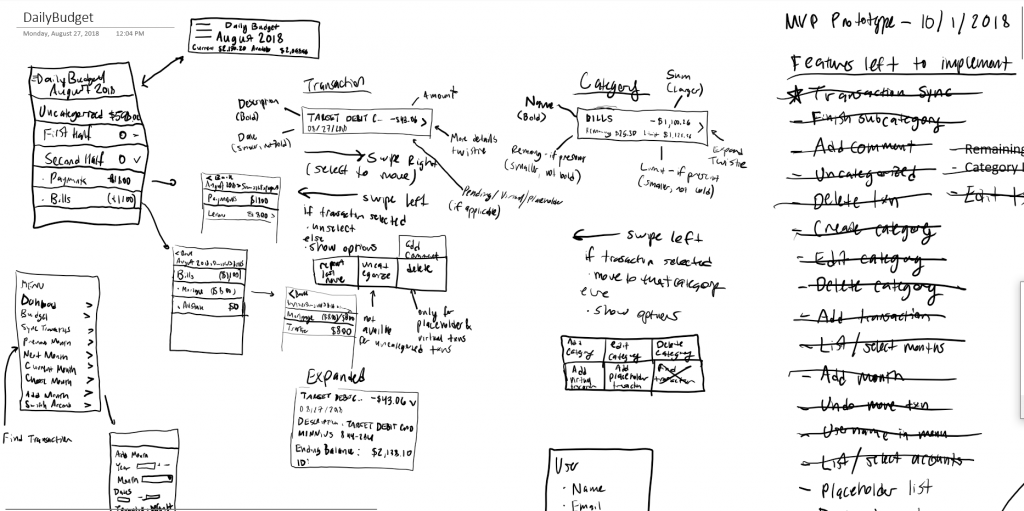
Though I didn’t have my original sketches of plan of the budgeting app from 2014, they were still pretty fresh in my mind. I decided to best place to start was to sketch out what I thought the app was going to look like. Again, I had had years to think about what a budgeting app would look like. Per my previous post, the goal of the app was to be able to categorize transactions, with categories having their own subcategories in some places. So whatever I sketched needed to integrate a list of transactions with a list of categories. Ultimately what I drew up was very reminiscent of my original sketches from 2014.
Instead of using paper to sketch, I decided to use Microsoft OneNote, combined with a touch screen and stylus. And now it’s time for another one of my asides! I am fortunate enough to have my hands on a Lenovo X1 Yoga. People! This machine is awesome! It is both thin and durable, it has an excellent display, it has large solid state storage and a buttload of RAM (16GB to be exact), but my favorite features of this machine are that it folds from a laptop into a tablet and that it comes with a built in stylus! Using the stylus with OneNote is a real game changer.
You see, back in my university days, which started in the mid 2000’s, I wish I could’ve had a machine like this as my laptop. The “as my laptop” comment is sure to make anyone cringe who attended college pre-2000 because it sounds like I’m describing something I’m entitled to and couldn’t imagine doing college without. But we all had them by the mid 2000’s. There were still computer labs in university, and I often had to use them as an engineering student because they had software I needed that my laptop didn’t have. However, when it came to taking notes, many people brought their laptops to class. I was a pen and paper kinda guy, and still am for the most part. I would take notes during class, but the biggest trouble I ran into was the fact that the way notes were written on the board did not match the way notes are taken on paper. When professors lecture on the whiteboard or chalkboard, the notes go from left to right:

When I take those notes on a piece of lined paper, the notes usually go from top to bottom:
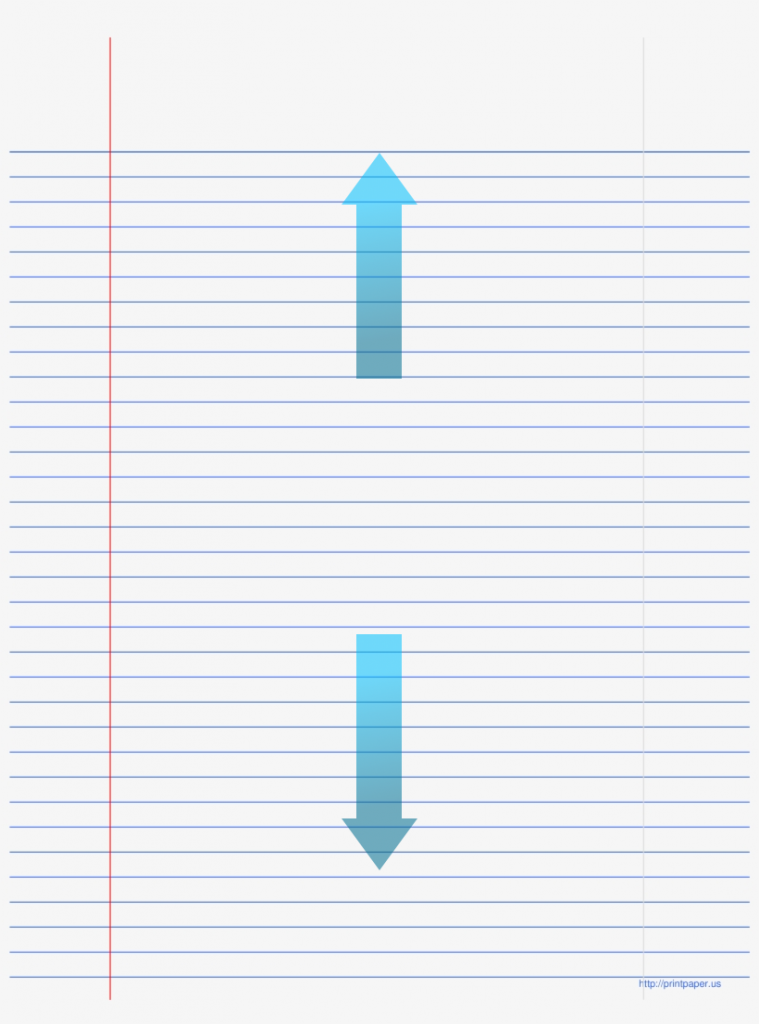
Original image from https://www.pngkey.com/detail/u2e6y3y3q8r5q8a9_college-ruled-notebook-paper-main-image-download-template/
This created trouble because when the professor would move locations on the chalkboard or whiteboard, I couldn’t move in that same direction on my paper. What I really wanted was that whatever the professor had written next to each other on the chalkboard, I wanted those things to be next to each other on my paper. This was especially true on occasions where the professor would draw arrows between different portions of his or her notes on the chalkboard. Executing those same arrows on my paper could have them going all over the place! Crossing other sections of notes that were unrelated! People, this was a thing that regularly happened! Listen, I get that there are other ways to take notes that don’t involve copying verbatim what the professor has written on the board. I just found that it was the most effective method for me.
Do you know how handy it would’ve been to just take a lasso around certain segments of my hand written notes on paper and move them around? Then two sections of notes that were collocated on the board, but written at different times, could be moved to be collocated on my paper. This is something I regularly thought about as a college notes taker. Well that’s what Microsoft OneNote with a stylus does for me! I can take the notes, erase whatever I need to, and move sections of notes around when it makes sense to do that. And you better believe that in my time using this combination of OneNote with a stylus that I have taken advantage of this feature plentifully.
Being able to diagram the User Experience was critical and crucial to being able to come up with a concrete design that I was also able to limit the scope of. Just know that scope limitation is important when doing software design, otherwise you’ll write code endlessly as you think of new really neato features along the way, and you’ll never deliver a finished product. In my case, where I could not be indefinitely writing this budgeting app, as I wanted to return to sleeping again at night like a normal human being, limiting the scope and features of the app to what was absolutely necessary was the only way I was going to actually get this done.
What I came up with was the MVP. Yes, the good old Minimum Viable Product. You can look in my sketch where I drew out what the app was going to look like. I drew snippets of what menus and options would show up as you did different gestures on different options. I drew arrows connecting one snippet to another, suggesting the flow between user interface elements. I notated elements, breaking them down into smaller components, which would give me direction for what they would look like to actually build. And that was my next step, building a Proof of Concept (or POC, as long as we are keeping up this theme of three-letter initialisms).
Ready, Set, Go!
I was now off to the races. It was time to start building something. Can you even believe how far we are into this blog post about building an app, and I am only now talking about actually building it? You really can’t take for granted the sheer amount of preparation that goes into an effort like this.
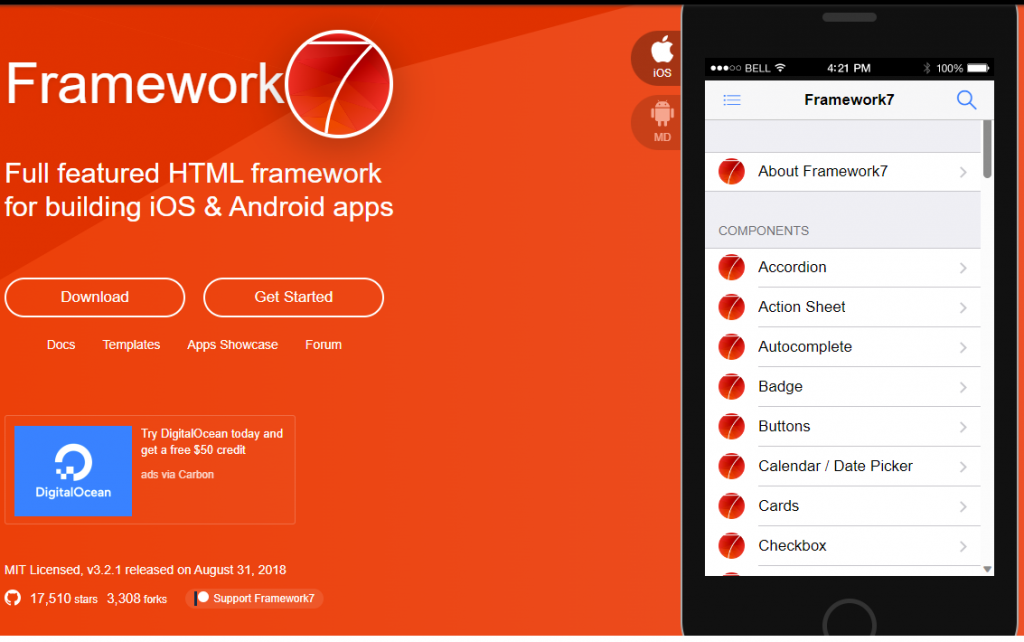
The first choice I had to make was choosing a UI framework. It wasn’t a choice of do I build it from scratch or choose a UI framework. I knew I couldn’t build something from scratch. I had tried that before, and that is a mammoth effort in and of itself. You spend much less time reading documentation and playing around a little bit, and then doing the occasional debugging, than you do building something that precisely matches your vision. I’m not sure exactly how I discovered Framework7, but it was the exact answer to my question (well, like 95% of an answer). I may have done some generic Google searches for menu type JavaScript UI framework, but when I found it, I very quickly realized how it could expedite my UI development.
Another thing I knew would be crucial was data binding in my UI. For those who were around during the MVC era of UI development, you will know how much of an improvement MVVM was to the MVC paradigm. You can accomplish MVVM using a two-way binding framework, and I had experience using AngularJS. Only, I didn’t love AngularJS. I recognize that it had a lot of shortcomings and I didn’t love its evolution, Angular, any better. Angular was aimed at solving the shortcomings the original AngularJS had, but one of the approaches it took was to rebuild it all in TypeScript. TypeScript. Oh TypeScript. Plenty of people love it. And I get why, I really do. But for me, TypeScript takes the one good thing about JavaScript (to me, at least), and waters it down, chops it off, and burns it. As I discussed before, one of the reasons I made the switch from Java to JavaScript was to get away from strong typing and make development much more rapid. My goal here was quick development, people! TypeScript brought type safety back to JavaScript. I could deal with that, I suppose. But what made TypeScript more cumbersome was keeping up with the Typings. Especially as you went from one version of a library to the next. I had to deal with this at work, as some of our codebase at work was written in TypeScript. I think TypeScript means well, but at the end of the day we took a clunky engine and bolted on safety measures, rather than just rebuilding the engine. (I realize I’m knocking my language of choice with this remark, but I don’t think TypeScript was the right answer to JavaScript.) If you want a frontend language that fixes the shortcomings of JavaScript, don’t go halfway with TypeScript… Go all the way with a language like Dart.
I could’ve stuck with AngularJS, since I knew it and it still worked to solve my problem. But AngularJS is a large heavy library with a lot of features. I didn’t need all of that. I just wanted simple two-way binding. I didn’t need the entire gargantuan framework that came with all of AngularJS. I took this one to the internet. I went to the Software Recommendations Stack Exchange site, softwarerecs.stackexchange.com (since you’re not supposed to use Stack Overflow for these kinds of questions), and I asked if there existed a Light HTML Two-way binding library. I got back a few answers, but what I quickly learned was the merit of a library like Vue.js. I had already seen a reference to Vue when exploring the Framework7 UI Framework, but I originally hadn’t considered it because it still seemed too heavy for what I was trying to do. Upon exploring it further, I learned that even with all of its features, it is still much smaller than AngularJS, and it has an option to run as a script directly from a webpage, as opposed to needing to be compiled/transpiled like anything written in TypeScript. This was the winner, the clear solution to my problem!
Into the pastures we go!
Greenfield development, here we are! While I had been exploring different frameworks and libraries for the front end, I had been writing code the whole time. This was all in an attempt to test out how all of these different frameworks suited my app requirements. Before I wrote any permanent code – code that is worthy of being checked into a git repository, if you will – I wanted to put together a proof of concept using Framework7 and Vue.js. This is the natural order of app development. Before I actually write the app, I need to make sure the tools/libraries/frameworks I am investing in will actually get the job done. But before I can do a proof of concept, I need an actual concept to prove, and this is what all of the UX design on paper (“paper”) was for.
Framework7 offers an options to include it as a script from an HTML page, or to use a tool like webpack to compile it to JavaScript. I was worried that there would be too much of a learning curve using the webpack method (having never specifically used it before), so I decided to write my proof of concept in HTML, referencing the Framework7 and Vue libraries as script tags in my HTML head section. Remember, I was trying to be the absolute most productive with the time I was devoting to this, so I didn’t want to spend it learning and not building if I didn’t have to.
I was able to build a version of the app that embodied my UI sketches all in HTML with Framework7 and Vue. Just for the proof of concept, I hard coded all of the data – the data was hardcoded as a model that Vue referenced, rather than hardcoded into the HTML. I started going through the different widgets that Framework7 offers, seeing how they could turn my sketches into reality with a relatively small number of lines of code. In the proof of concept, I was able to build one of the most complex aspects of the budgeting app, which was nested accordion lists with various elements within each list item.
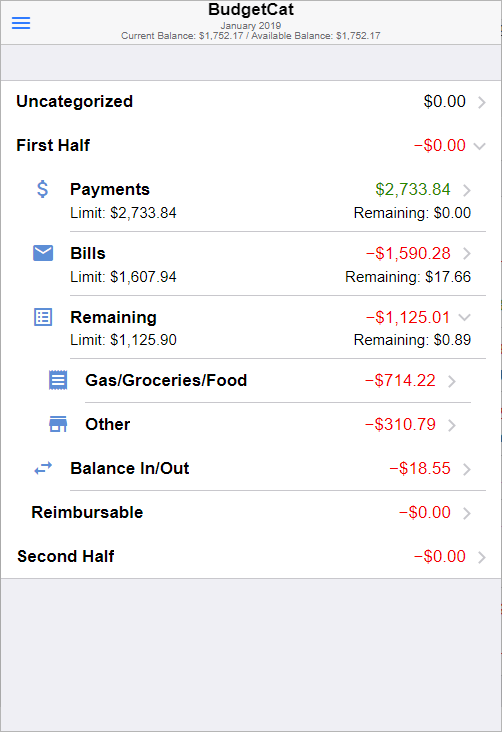
Per my sketches, every list item was either a parent category or an individual transaction. A category could either hold more subcategories, or transactions, but never both. The “never both” was a design decision I made to simplify building it. Also, there didn’t seem like a good use case for a category to hold both subcategories and transactions. If a list item was a category, I needed it to show its category name and sum total, and optionally an icon, its limit and how much is remaining. If a list item was a transaction, it needed to show the transaction details, the amount, and the date. Building this to match my sketch took some effort, but I was able to pull it off.
With a working proof of concept and a design full of UI sketches, I was able to get to the meat of the app development. My app design required a backend that served as an API to interact with the persistence (database) layer and a frontend that fetched data from the API backend, and bound it to the view, which was ultimately rendered by Framework7 and Vue. With this separation of backend and frontend, the approach I took was to entirely create the backend first, and once that was done, create the frontend on top of the backend. My reasoning for doing it this way, as opposed to building the backend and frontend in tandem for each feature, came down to a couple of reasons:
- It can be difficult to constantly switch back and forth between backend and frontend worlds. If I lived in the backend until I was able to surface and come up to do frontend development, it would be easier to keep track of code writing and ensure quality.
- I already had a proof of concept UI with dummy data. By the time I wanted to be developing the frontend, I wanted to do it with real data, and not more fake data. I could have definitely staged real data, but that would have only worked for the initial presentation. Anything I would have done to manipulate the data, such as move a transaction to a different category or create a new category, would have prevented me from doing real frontend testing during development.
- As I built the backend, I could test it with a tool like Postman. I could test all the standard cases/happy paths and all of the edge cases and error handling. I could do this much more thoroughly with Postman and direct API calls than I could testing the API only with the frontend.
Based on the UX design I had sketched out, I created a list of API endpoints required to accomplish each UX maneuver.
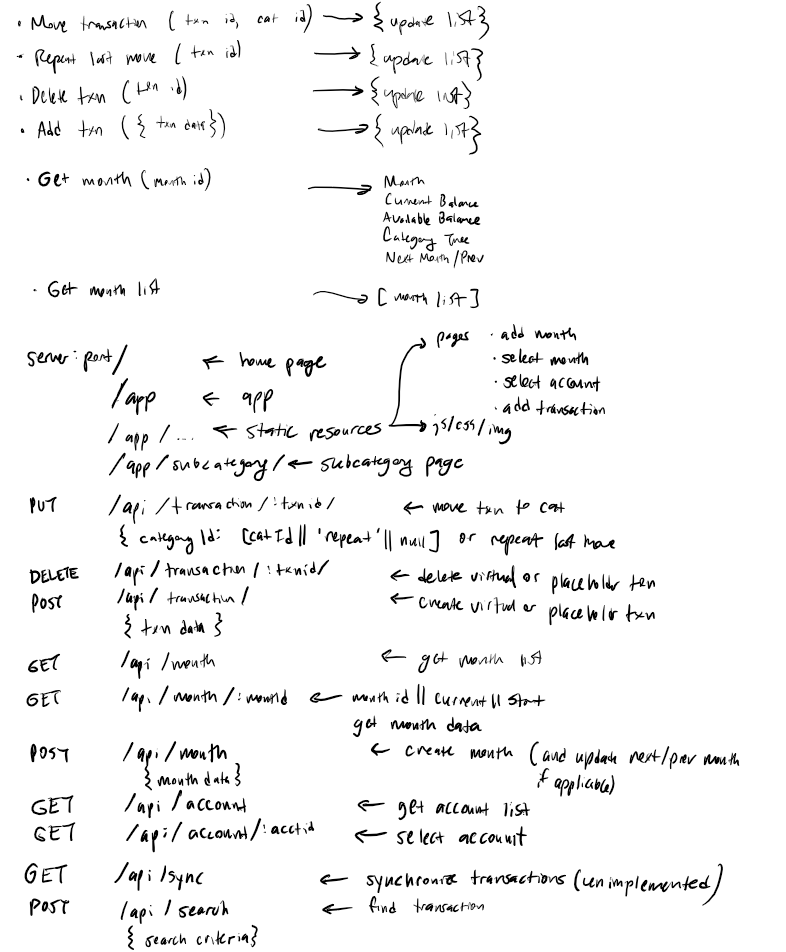
My goal was to have a REST-style API, but in hindsight, I don’t think it would meet the requirements to actually be considered a REST API. I wrote the API interactions to be tailor fit to the needs of the app, rather than making it a ubiquitous API that could accommodate a generic client. Though the requests take on traditional REST-style form, the responses typically didn’t include an updated version of the resource referenced or passed in the API call. Would I have done it any differently? Probably not. It didn’t need to be REST compliant just for the sake of it. I just needed something that was functional and maintanable.
The entire frontend/backend interaction can be summed up with this diagram:
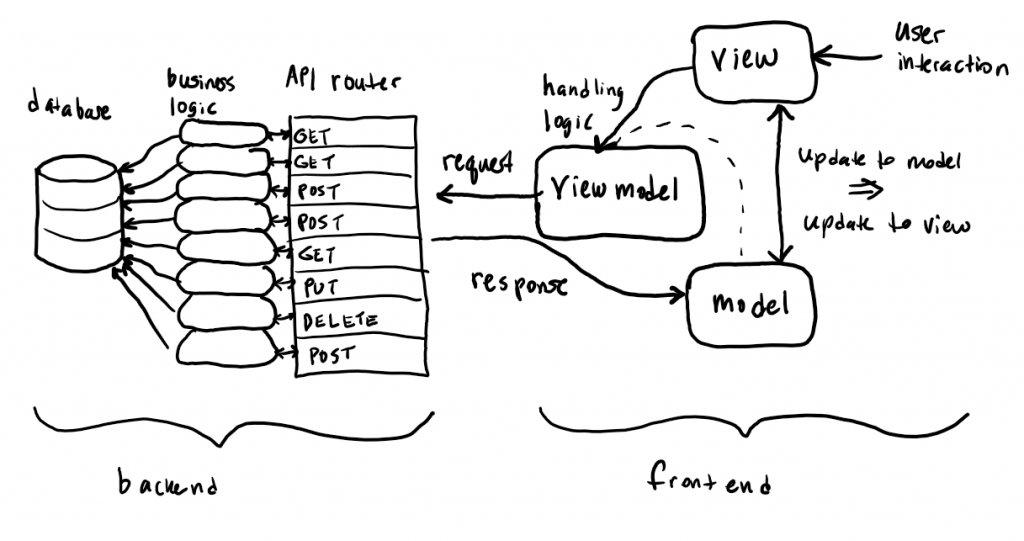
A user interaction to the UI view invokes the view model, grabbing a portion of the model to be sent as part of a request to the API. For example, a user may interact with the view to attempt to update the category of a single transaction. That transaction ID is sent as part of a PUT request to the API to update a transaction. This request gets routed appropriately to the correct handler, invokes business logic which in turn makes an update to the database. The handler then reads the new database value, and sends it back in its response. The frontend receives this response back to the view model (which originally made the request), and updates the model. An update to the model triggers an update to the view, and the user interaction is complete. Note that an interaction to change (like a transaction’s category update or creating a new category) the model does not directly change the model. The frontend sends all interactions as requests to the backend, and only the responses can update the model. To continue the example from before, once the API call returns its response with the new category ID, the view model receives it, updates the model accordingly, and this forces a view update that the user can see. Overall this is just a CRUD app, as every interaction results in a CRUD operation to the database and returns its response with the updated data.
As far as the database goes, I made a choice to base the database in MySQL. This was not for any one reason in particular, it was just the one I was most familiar with. Another good option would have been PostgreSQL, but I’ve had much less experience with PostgreSQL. I could’ve even abandoned the idea of a relational database and done a document/NoSQL database. The nested structure of the data lends itself to that being a reasonable option. However, I was already familiar with MySQL, MySQL specific syntax, MySQL database administration, and Node.js libraries for connecting to and manipulating MySQL data. I drafted out the schema in my design.
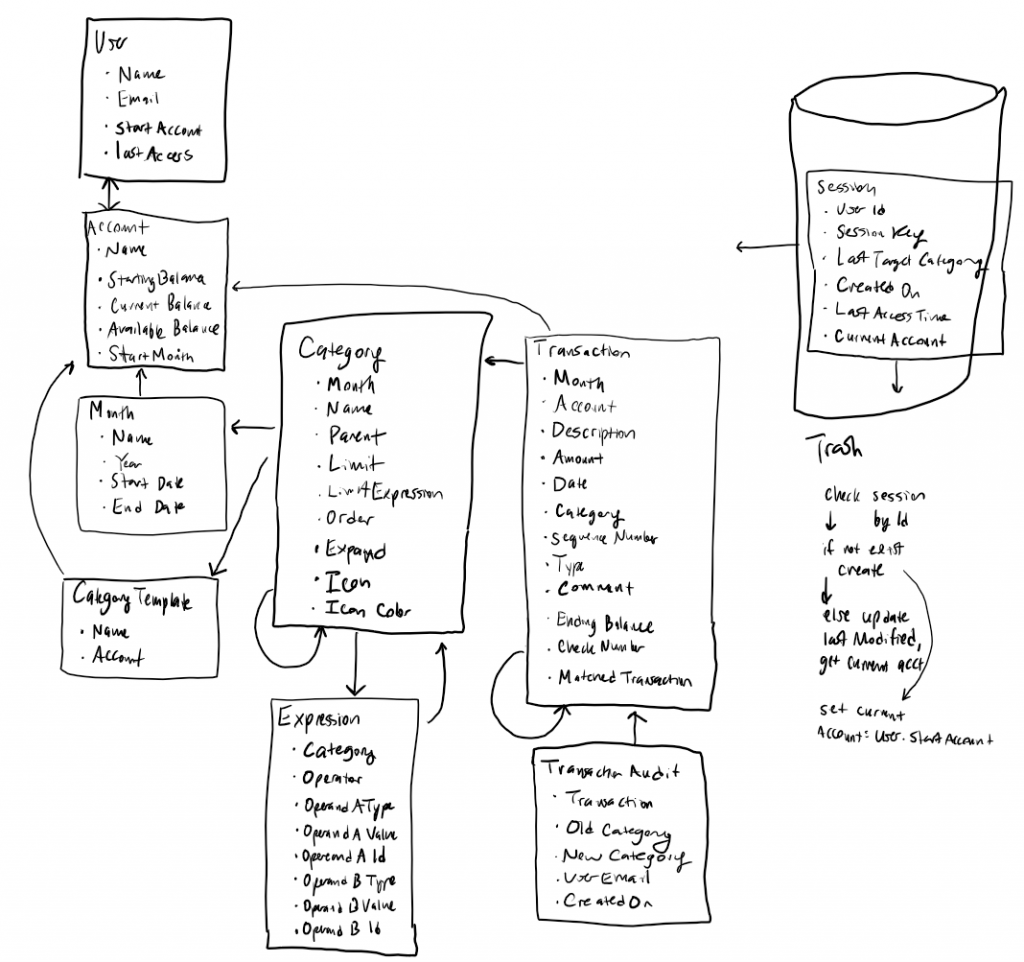
This represents the database and table schema that I went with for the app design. As I coded this all up, there was some amount of deviation from this original design, but it largely represents what was actually built.
Was I ready to hit the IDE and code to my heart’s content? Well, no, still not just yet. The last thing I did before I actually started writing the code that would make up the API was to take all of my API endpoints and write some pseudocode. The fact that I decided to section the code off into different API endpoints comes from my experience writing API code. That’s the way I had done it before, and I found it to be an effective way to go about API design and implementation. Is it the only way? Probably not, but I wasn’t waiting to proceed until I found the best possible way to do every task of development. I just needed a way to develop, one that was efficient enough so I could actually complete this project. Writing down the pseudocode for each API endpoint was a useful exercise that helped reinforce my design decisions and expose any deficiencies in my design.
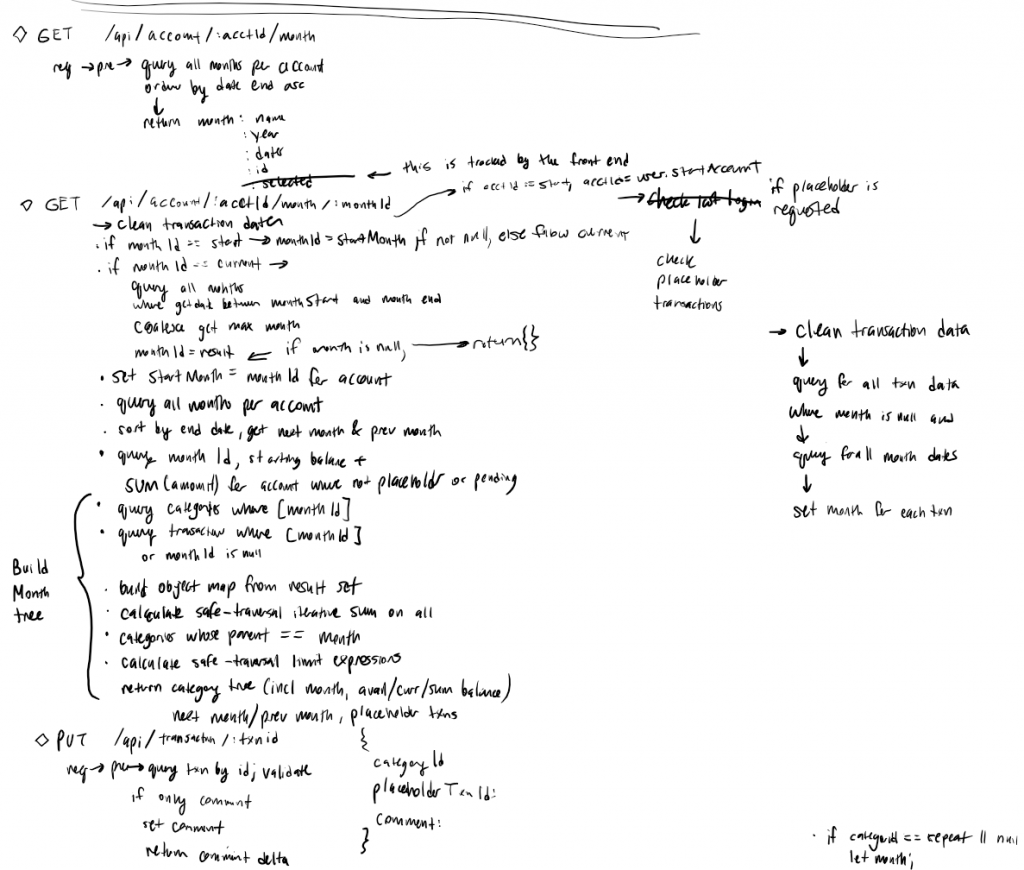
I had reasonably fleshed out the pseudocode and basic flow for every endpoint, and now I was able to start cranking out code.
The Hills are Alive!
Now that I was actually writing production code, I felt like Julie Andrews cast as Maria in The Sound of Music as she spun through the hills singing. Maybe this is silly imagery, but this kind of problem solving and creating is what I live for.
What I hadn’t discussed in this post yet, but I had basically already made my mind up on, was backend frameworks for my API and for my persistence (database). There are many out there, but there were two Node.js modules I was already familiar with and comfortable with to get the job done:
hapi
Hapi is an HTTP request/response framework perfectly suitable for building a REST API. The way the framework is set up makes it very easy to define routing:
<mark style="background-color:rgba(0, 0, 0, 0);color:#a63b1a" class="has-inline-color">const</mark> <mark style="background-color:rgba(0, 0, 0, 0)" class="has-inline-color has-colibri-color-2-color">CreateMonth</mark> = <mark style="background-color:rgba(0, 0, 0, 0)" class="has-inline-color has-colibri-color-4-color">require</mark>(<mark style="background-color:rgba(0, 0, 0, 0);color:#003fa3" class="has-inline-color">'./month/create-month'</mark>);
<mark style="background-color:rgba(0, 0, 0, 0);color:#a63b1a" class="has-inline-color">const</mark> <mark style="background-color:rgba(0, 0, 0, 0)" class="has-inline-color has-colibri-color-2-color">ListMonth</mark> = <mark style="background-color:rgba(0, 0, 0, 0)" class="has-inline-color has-colibri-color-4-color">require</mark>(<mark style="background-color:rgba(0, 0, 0, 0);color:#003fa3" class="has-inline-color">'./month/list-month'</mark>);
<mark style="background-color:rgba(0, 0, 0, 0);color:#a63b1a" class="has-inline-color">const</mark> <mark style="background-color:rgba(0, 0, 0, 0)" class="has-inline-color has-colibri-color-2-color">GetMonth</mark> = <mark style="background-color:rgba(0, 0, 0, 0)" class="has-inline-color has-colibri-color-4-color">require</mark>(<mark style="background-color:rgba(0, 0, 0, 0);color:#003fa3" class="has-inline-color">'./month/get-month'</mark>);
module.<mark style="background-color:rgba(0, 0, 0, 0)" class="has-inline-color has-colibri-color-1-color">exports</mark> = [
{
<mark style="background-color:rgba(0, 0, 0, 0)" class="has-inline-color has-colibri-color-1-color">method</mark>: <mark style="background-color:rgba(0, 0, 0, 0);color:#003fa3" class="has-inline-color">'GET'</mark>,
<mark style="background-color:rgba(0, 0, 0, 0)" class="has-inline-color has-colibri-color-1-color">path</mark>: <mark style="background-color:rgba(0, 0, 0, 0);color:#003fa3" class="has-inline-color">'/account/{acctId}/month'</mark>,
<mark style="background-color:rgba(0, 0, 0, 0)" class="has-inline-color has-colibri-color-1-color">config</mark>: <mark style="background-color:rgba(0, 0, 0, 0)" class="has-inline-color has-colibri-color-2-color">ListMonth</mark>
},
{
<mark style="background-color:rgba(0, 0, 0, 0)" class="has-inline-color has-colibri-color-1-color">method</mark>: <mark style="background-color:rgba(0, 0, 0, 0);color:#003fa3" class="has-inline-color">'POST'</mark>,
<mark style="background-color:rgba(0, 0, 0, 0)" class="has-inline-color has-colibri-color-1-color">path</mark>: <mark style="background-color:rgba(0, 0, 0, 0);color:#003fa3" class="has-inline-color">'/account/{acctId}/month'</mark>,
<mark style="background-color:rgba(0, 0, 0, 0)" class="has-inline-color has-colibri-color-1-color">config</mark>: <mark style="background-color:rgba(0, 0, 0, 0)" class="has-inline-color has-colibri-color-2-color">CreateMonth</mark>
},
{
<mark style="background-color:rgba(0, 0, 0, 0)" class="has-inline-color has-colibri-color-1-color">method</mark>: <mark style="background-color:rgba(0, 0, 0, 0);color:#003fa3" class="has-inline-color">'GET'</mark>,
<mark style="background-color:rgba(0, 0, 0, 0)" class="has-inline-color has-colibri-color-1-color">path</mark>: <mark style="background-color:rgba(0, 0, 0, 0);color:#003fa3" class="has-inline-color">'/account/{acctId}/month/{monthId}'</mark>,
<mark style="background-color:rgba(0, 0, 0, 0)" class="has-inline-color has-colibri-color-1-color">config</mark>: <mark style="background-color:rgba(0, 0, 0, 0)" class="has-inline-color has-colibri-color-2-color">GetMonth</mark>
},
...Code language: HTML, XML (xml)Then I can consolidate each route into its own function, and group similar routes into their own files. Hapi makes route definition repeatable, consistent, and convenient. Here is an example configuration from a Hapi route:
<mark style="background-color:rgba(0, 0, 0, 0)" class="has-inline-color has-colibri-color-3-color">// GET /api/account/:acctId/month</mark>
<mark style="background-color:rgba(0, 0, 0, 0);color:#a63b1a" class="has-inline-color">const</mark> listMonth = {
    <mark style="background-color:rgba(0, 0, 0, 0)" class="has-inline-color has-colibri-color-1-color">tags</mark>: [<mark style="background-color:rgba(0, 0, 0, 0);color:#003fa3" class="has-inline-color">'api'</mark>],
    <mark style="background-color:rgba(0, 0, 0, 0)" class="has-inline-color has-colibri-color-1-color">description</mark>: <mark style="background-color:rgba(0, 0, 0, 0);color:#003fa3" class="has-inline-color">"Lists all month for the active user's account"</mark>,
    <mark style="background-color:rgba(0, 0, 0, 0)" class="has-inline-color has-colibri-color-1-color">validate</mark>: {
        <mark style="background-color:rgba(0, 0, 0, 0)" class="has-inline-color has-colibri-color-1-color">params</mark>: {
            <mark style="background-color:rgba(0, 0, 0, 0)" class="has-inline-color has-colibri-color-1-color">acctId</mark>: <mark style="background-color:rgba(0, 0, 0, 0)" class="has-inline-color has-colibri-color-2-color">Joi</mark>.<mark style="background-color:rgba(0, 0, 0, 0)" class="has-inline-color has-colibri-color-4-color">string</mark>().<mark style="background-color:rgba(0, 0, 0, 0)" class="has-inline-color has-colibri-color-4-color">guid</mark>().<mark style="background-color:rgba(0, 0, 0, 0)" class="has-inline-color has-colibri-color-4-color">required</mark>()
        },
        <mark style="background-color:rgba(0, 0, 0, 0)" class="has-inline-color has-colibri-color-4-color">failAction</mark>: <mark style="background-color:rgba(0, 0, 0, 0);color:#a63b1a" class="has-inline-color">async</mark> (request, h, err) => {
            console.<mark style="background-color:rgba(0, 0, 0, 0)" class="has-inline-color has-colibri-color-4-color">log</mark>(err);
            <mark style="background-color:rgba(0, 0, 0, 0);color:#a63b1a" class="has-inline-color">return</mark> <mark style="background-color:rgba(0, 0, 0, 0)" class="has-inline-color has-colibri-color-2-color">Boom</mark>.<mark style="background-color:rgba(0, 0, 0, 0)" class="has-inline-color has-colibri-color-4-color">badRequest</mark>(<mark style="background-color:rgba(0, 0, 0, 0);color:#003fa3" class="has-inline-color">`Invalid parameters:</mark> ${err.<mark style="background-color:rgba(0, 0, 0, 0)" class="has-inline-color has-colibri-color-1-color">details</mark>.<mark style="background-color:rgba(0, 0, 0, 0)" class="has-inline-color has-colibri-color-4-color">map</mark>(detail => detail.<mark style="background-color:rgba(0, 0, 0, 0)" class="has-inline-color has-colibri-color-1-color">message</mark>).<mark style="background-color:rgba(0, 0, 0, 0)" class="has-inline-color has-colibri-color-4-color">join</mark>(<mark style="background-color:rgba(0, 0, 0, 0);color:#003fa3" class="has-inline-color">', '</mark>)}<mark style="background-color:rgba(0, 0, 0, 0);color:#003fa3" class="has-inline-color">`</mark>, err);
        }
    },
    <mark style="background-color:rgba(0, 0, 0, 0)" class="has-inline-color has-colibri-color-1-color">pre</mark>: [
        { <mark style="background-color:rgba(0, 0, 0, 0)" class="has-inline-color has-colibri-color-1-color">method</mark>: <mark style="background-color:rgba(0, 0, 0, 0)" class="has-inline-color has-colibri-color-2-color">Pre</mark>.<mark style="background-color:rgba(0, 0, 0, 0)" class="has-inline-color has-colibri-color-1-color">requestingUser</mark>, <mark style="background-color:rgba(0, 0, 0, 0)" class="has-inline-color has-colibri-color-1-color">assign</mark>: <mark style="background-color:rgba(0, 0, 0, 0);color:#003fa3" class="has-inline-color">'user'</mark> }
    ],
    <mark style="background-color:rgba(0, 0, 0, 0)" class="has-inline-color has-colibri-color-1-color">handler</mark>: <mark style="background-color:rgba(0, 0, 0, 0);color:#a63b1a" class="has-inline-color">async</mark> (request, h) => {
        <mark style="background-color:rgba(0, 0, 0, 0)" class="has-inline-color has-colibri-color-3-color">// Month fetching and processing logic</mark>
        ...
    }
}Code language: HTML, XML (xml)
Here, the configuration scheme allows us to have a description (for API documentation purposes), both a definition and fallback action for our parameter validation (between path parameters, query string parameters, and body parameters), common methods to run before (pre) our handler, authentication details (not shown here), a function to handle the request and generate the response, and many other options. Having the route configuration broken down this way significantly reduces the amount of boilerplate code required to implement each route. If there was one thing I was looking for writing this app, it was reducing how much code I had to write.
There is one other popular HTTP framework in Node.js: Express.js. I have also used that in the past, and I have used that for other projects since too. Where I feel like Express really shines is as a web server, serving web content. Express also has API application server capabilities, but this is what Hapi was bred to do. Likewise, Hapi has web server capabilities, but Express is my preferred option when it comes to implementing a web server in Node.js.
knex
When you have to connect structured code to a SQL database, two options are either to write code that generates SQL queries and statements or to use an ORM. The challenge with writing code that generates SQL queries is that you have to be very careful about plugging in user provided data as parameters to your queries and statements so as to prevent SQL injection attacks. On the other hand, the challenge with using an ORM is that it can abstract some of the features that allow you to write efficient SQL queries, especially when joining many tables together, which can hamper performance. I was actually familiar with a very useful JavaScript ORM called Bookshelf.js, which I used in projects at work, and based on the way it was used in these projects, it performed very well.
I decided against using Bookshelf.js, or an ORM at all, because I wanted to have a lot more control over the queries and statements that were being issued to my database. Bookshelf is actually built on top of knex.js, which is simply a query builder that transforms query building into a series of function calls reminiscent of any ordinary JavaScript code. One if its biggest advantages is its safe use of parameter insertion to a query, which effectively prevents SQL injection attacks. Beyond that, it gives me the ability to write extended join queries without my code all of a sudden turning from JavaScript into SQL. Using knex appears like I am still interacting with a JavaScript library while maintaining the flexibility of generating more intricate queries. Here is an example:
<mark style="background-color:rgba(0, 0, 0, 0);color:#a63b1a" class="has-inline-color">let</mark> monthSet = <mark style="background-color:rgba(0, 0, 0, 0);color:#a63b1a" class="has-inline-color">await</mark> request.<mark style="background-color:rgba(0, 0, 0, 0)" class="has-inline-color has-colibri-color-4-color">knex</mark>('month')
    .<mark style="background-color:rgba(0, 0, 0, 0)" class="has-inline-color has-colibri-color-4-color">innerJoin</mark>(<mark style="background-color:rgba(0, 0, 0, 0);color:#003fa3" class="has-inline-color">'account'</mark>, <mark style="background-color:rgba(0, 0, 0, 0);color:#003fa3" class="has-inline-color">'month.accountId'</mark>, <mark style="background-color:rgba(0, 0, 0, 0);color:#003fa3" class="has-inline-color">'account.id'</mark>)
    .<mark style="background-color:rgba(0, 0, 0, 0)" class="has-inline-color has-colibri-color-4-color">innerJoin</mark>(<mark style="background-color:rgba(0, 0, 0, 0);color:#003fa3" class="has-inline-color">'userHasAccount'</mark>, <mark style="background-color:rgba(0, 0, 0, 0);color:#003fa3" class="has-inline-color">'account.id'</mark>, <mark style="background-color:rgba(0, 0, 0, 0);color:#003fa3" class="has-inline-color">'userHasAccount.accountId'</mark>)
    .<mark style="background-color:rgba(0, 0, 0, 0)" class="has-inline-color has-colibri-color-4-color">innerJoin</mark>(<mark style="background-color:rgba(0, 0, 0, 0);color:#003fa3" class="has-inline-color">'user'</mark>, <mark style="background-color:rgba(0, 0, 0, 0);color:#003fa3" class="has-inline-color">'userHasAccount.userId'</mark>, <mark style="background-color:rgba(0, 0, 0, 0);color:#003fa3" class="has-inline-color">'user.id'</mark>)
    .<mark style="background-color:rgba(0, 0, 0, 0)" class="has-inline-color has-colibri-color-4-color">select</mark>(<mark style="background-color:rgba(0, 0, 0, 0);color:#003fa3" class="has-inline-color">'month.id'</mark>, <mark style="background-color:rgba(0, 0, 0, 0);color:#003fa3" class="has-inline-color">'month.name'</mark>, <mark style="background-color:rgba(0, 0, 0, 0);color:#003fa3" class="has-inline-color">'year'</mark>, <mark style="background-color:rgba(0, 0, 0, 0);color:#003fa3" class="has-inline-color">'startDate'</mark>, <mark style="background-color:rgba(0, 0, 0, 0);color:#003fa3" class="has-inline-color">'endDate'</mark>)
    .<mark style="background-color:rgba(0, 0, 0, 0)" class="has-inline-color has-colibri-color-4-color">where</mark>({
        <mark style="background-color:rgba(0, 0, 0, 0);color:#003fa3" class="has-inline-color">'user.email'</mark>: request.<mark style="background-color:rgba(0, 0, 0, 0)" class="has-inline-color has-colibri-color-1-color">pre</mark>.<mark style="background-color:rgba(0, 0, 0, 0)" class="has-inline-color has-colibri-color-1-color">user</mark>.<mark style="background-color:rgba(0, 0, 0, 0)" class="has-inline-color has-colibri-color-1-color">email</mark>,
        <mark style="background-color:rgba(0, 0, 0, 0);color:#003fa3" class="has-inline-color">'account.id'</mark>: request.<mark style="background-color:rgba(0, 0, 0, 0)" class="has-inline-color has-colibri-color-1-color">params</mark>.<mark style="background-color:rgba(0, 0, 0, 0)" class="has-inline-color has-colibri-color-1-color">acctId</mark>
    })
    .<mark style="background-color:rgba(0, 0, 0, 0)" class="has-inline-color has-colibri-color-4-color">orderBy</mark>(<mark style="background-color:rgba(0, 0, 0, 0);color:#003fa3" class="has-inline-color">'endDate'</mark>);
Code language: HTML, XML (xml)
The query this code will end up generating looks like:
select `month`.`id`, `month`.`name`, `year`, `startDate`, `endDate`
from `month`
inner join `account` on `month`.`accountId` = `account`.`id`
inner join `userHasAccount` on `account`.`id` = `userHasAccount`.`accountId`
inner join `user` on `userHasAccount`.`userId` = `user`.`id`
where `user`.`email` = ? and `account`.`id` = ?
order by `endDate` ascCode language: JavaScript (javascript)
The newlines are added for clarity. Otherwise, using knex is much more programmer friendly than writing out the entire query within my JavaScript code and attempting to bind the parameters at the end. That is still certainly an option, and the parameter binding in knex alone elevates it above not using a SQL generation library at all. Here is another example of using knex for an INSERT statement:
<mark style="background-color:rgba(0, 0, 0, 0);color:#a63b1a" class="has-inline-color">await </mark>request.<mark style="background-color:rgba(0, 0, 0, 0)" class="has-inline-color has-colibri-color-4-color">knex</mark>('month')
    .<mark style="background-color:rgba(0, 0, 0, 0)" class="has-inline-color has-colibri-color-4-color">transacting</mark>(trans)
    .<mark style="background-color:rgba(0, 0, 0, 0)" class="has-inline-color has-colibri-color-4-color">insert</mark>({
        <mark style="background-color:rgba(0, 0, 0, 0)" class="has-inline-color has-colibri-color-1-color">id</mark>: monthId,
        <mark style="background-color:rgba(0, 0, 0, 0)" class="has-inline-color has-colibri-color-1-color">accountId</mark>: request.<mark style="background-color:rgba(0, 0, 0, 0)" class="has-inline-color has-colibri-color-1-color">params</mark>.<mark style="background-color:rgba(0, 0, 0, 0)" class="has-inline-color has-colibri-color-1-color">acctId</mark>,
        <mark style="background-color:rgba(0, 0, 0, 0)" class="has-inline-color has-colibri-color-1-color">name</mark>: request.<mark style="background-color:rgba(0, 0, 0, 0)" class="has-inline-color has-colibri-color-1-color">payload</mark>.<mark style="background-color:rgba(0, 0, 0, 0)" class="has-inline-color has-colibri-color-1-color">name</mark>,
        <mark style="background-color:rgba(0, 0, 0, 0)" class="has-inline-color has-colibri-color-1-color">year</mark>: request.<mark style="background-color:rgba(0, 0, 0, 0)" class="has-inline-color has-colibri-color-1-color">payload</mark>.<mark style="background-color:rgba(0, 0, 0, 0)" class="has-inline-color has-colibri-color-1-color">year</mark>,
        <mark style="background-color:rgba(0, 0, 0, 0)" class="has-inline-color has-colibri-color-1-color">startDate</mark>: request.<mark style="background-color:rgba(0, 0, 0, 0)" class="has-inline-color has-colibri-color-1-color">payload</mark>.<mark style="background-color:rgba(0, 0, 0, 0)" class="has-inline-color has-colibri-color-1-color">startDate</mark>,
        <mark style="background-color:rgba(0, 0, 0, 0)" class="has-inline-color has-colibri-color-1-color">endDate</mark>: request.<mark style="background-color:rgba(0, 0, 0, 0)" class="has-inline-color has-colibri-color-1-color">payload</mark>.<mark style="background-color:rgba(0, 0, 0, 0)" class="has-inline-color has-colibri-color-1-color">endDate</mark>
    });Code language: HTML, XML (xml)
Again, it’s nice to see this SQL insertion written as JavaScript code instead of writing an entire SQL INSERT statement embedded in my JavaScript code where I attempt to bind parameters. What is snuck in here is this line:
.<mark style="background-color:rgba(0, 0, 0, 0)" class="has-inline-color has-colibri-color-4-color">transacting</mark>(trans)Code language: HTML, XML (xml)Which is an incredibly convenient way to do SQL transactions. Prior to this specific code block, I began a transaction, and am running this statement within that transaction. You may also notice that I am sending in parameters straight from my HTTP request payload, which I am able to do because by this point in the API route, my parameters would have been validated, thanks to Hapi’s validation scheme.
Knex provides all sorts of ways to still let you have control over the nuances of your queries. For example, you can still put functions in your queries, such as COALESCE or even CASE…WHEN…ELSE…END. It gives you the ability to order by column positions to instead of saying the field name. And also, I can still do cross-character set joins. All of these are things that came up while developing this app. Note that this level of control over your queries is extremely unstraightforward using an ORM (however, in many cases it is not necessary either). Because of its flexibility and conciseness, knex was a wise choice as a library for my persistence.
Basic HTTP Authentication
In addition to technologies for my API and for my persistence, I had to make a choice for how I was going to handle authentication. This was going to serve data across the web, after all, and I didn’t want just anybody seeing it! A technology I was familiar with from work is called JWT, or JSON Web Tokens (but pronounced “Jot”, because, of course!). JWT is a fairly simple technology that, after a successful user/password authentication, is generated by the backend, stored as a cookie on the frontend, and is presented upon each call to the backend to ensure proper authenticity.
I decided against JWT because it was going to be more coding and integration (and not to mention, an actual login page) and there was another technology I had used in the past, which is Basic HTTP Authentication. Some of you may be reading this thinking, red flag! Are you kidding me?? It is easy to ridicule Basic HTTP authentication because it requires the username and password are part of every HTTP request to the backend as an HTTP header. It is not in plain text, but it’s not far from it – it is simply base-64 encoded. But then we remember a technology to counter that threat: SSL/TLS! If I am serving my page over HTTPS instead of plain HTTP, that means all requests back and forth are fully encrypted. Then it doesn’t matter if my username and password were in plain text at all in the HTTP request, because once it leaves the browser, it is entirely encrypted. And truthfully, I am not worried about security risks from my browser, because I am the only one using the app on my iPhone. I use it only in Incognito mode on PCs.
A decision to serve my website using HTTPS instead of plain HTTP meant that I was going to need to not only set up web server to serve using TLS, but also I would need to obtain and install an SSL certificate too. When you use sites like WordPress.com or even GitHub pages, the SSL certificate and HTTPS is taken care of for you, but when you are hosting your own site, whether from a cloud VM or a physical machine, it’s your problem to figure out. Luckily in the modern day, I can obtain SSL certificates free from Let’s Encrypt. This site makes it very simple to install and keep your SSL certificate up-to-date.
Compared to implementing JWTs for authentication, setting up HTTPS over TLS was a one-time effort. When using Basic HTTP authentication, your browser handles requesting the username and password. This is in contrast to other methods of authentication, when you build a specific page in your site dedicated to collecting your username and password, and sending it back to your server as an HTTP request to complete authentication. Literally any professional site would build their own page for authentication into the user experience rather than relying on Basic HTTP authentication where the browser itself asks for credentials. But again, this app was just for me, and saving time not having to build a dedicated authentication page as well as JWT (or some other authentication technology) integration was time well saved. It is again worth mentioning that Basic HTTP authentication over TLS is no less secure than JWT in terms of cross-internet traffic.
Wrapping up the back end
I remember having Netflix on at 1 in the morning sitting next to my wife developing the backend one evening. I was in the zone. My wife turned to me and said, “your app looks very boring.” She saw many monotonous lines of code. I saw all these little parts fitting together, starting to form a larger engine. I can’t say exactly what I find so exciting about writing code. Maybe it’s the problem solving aspect. Maybe it’s the fact that I am building something large from smaller pieces, like I would with Legos. But something about developing an app, especially of my own design and for my own purpose, was very satiating. And it’s definitely not for everyone. I think some people just have the mind for it. And apparently my wife isn’t one of them.
Unlike what I would do at work, I didn’t write a suite of automated unit test cases. Though I believe that is a best practice, I also think it is a best practice on someone else’s dime. Maybe that’s hypocritical… What I decided to do instead was to manually run through all of my test cases with Postman, hitting every API endpoint with various good and bad input, and validating expected responses. In my mind I had a very good idea of how to comprehensively hit every possibility of every endpoint. I say every possibility because it would be foolish to only test the most common scenarios and ignore the edge cases. This process was helpful, important, and expository, as it was the most effective way to show me where bugs in my code were.
Once I felt good about the backend, I started back on the frontend (see what I did there?). The approach I basically always start with when writing front end code in HTML is to have three separate files:
- index.html
This defines the user interface component layout. It is written in HTML. - script.js
This defines the behavior when a user interacts with the user interface. It is written in JavaScript. - style.css
This defines the look and feel of the user interface, from widths and heights of components to specific colors. It is written in CSS.
I pretty much don’t deviate from those names either. I develop each of these as single code units until they become so large and there is an obvious place to split them into smaller units.
I already had my Framework7 based proof of concept, so I slowly started replacing the example data with API calls to the backend to fetch real data. By this point, I had real transaction data from my bank because you can only get so far with synthesized test data – it usually doesn’t cover all real world scenarios. In the vein of spending the least amount of time in development, my goal was to utilize Framework7’s direct frontend integration. Framework7 (as well as Vue) has two methods to integrate them into your codebase:
- Frontend integration through an HTML file using a
scripttag. This allows you to quickly take advantage of the capabilities of the framework with very minimal overhead. All development takes place in static HTML files and associated resources, such as JavaScript files referenced from your HTML file. - Backend compiled integration. This is written in Node.js and compiled to cross-browser compatible JavaScript using a tool like webkit or browserify. Instead of developing the HTML, JavaScript, and CSS files that a browser uses directly, you write many, more modular files, each of which become compiled into JavaScript and HTML files that the browser will use. This gives you access to JavaScript language features that may not be available in the versions of JavaScript that web browsers are capable of, which makes writing code more flexible and maintainable. What you lose in quick integration you gain in code maintainability and extensibility.
Initially, the reason I chose direct frontend integration was because it seemed unnecessary to go through the effort and time expense of setting up the entire backend environment when I could achieve exactly what I wanted to writing static HTML, JavaScript and CSS files.
What I haven’t mentioned up till this point is that at no point in my decision to build an app have I made any mention of using a technology geared toward mobile development. I haven’t mentioned making an iOS app in Objective-C or Swift, nor have I said anything about Java and Android Studio. This is because I was architecturally targeting having this run as a webapp through the browser. This decision allowed me to work with app development technologies with which I was already familiar, and it made it cross platform accessible between mobile devices and PCs. I absolutely had every intention to target a touch-enabled environment, as gestures were integral to the app’s user experience, but the Lenovo X1 Yoga PC I was developing on has a touch screen, so it made development easy there. Ultimately, as I was writing this entire app for myself, I only needed to target developing for one single specific runtime environment: iOS Safari.
Not needing to ensure cross-browser compatibility beyond iOS Safari and Google Chrome (where I was testing it on my PC), I thought I would be safe not using a JavaScript compiler like webkit or browserify. Well Framework7 (and Vue) development came to a screeching halt when I ran into issues binding Vue to Framework7 elements’ HTML attributes. This was causing my app to not work at all. Framework7 specifically has an extension intended for compatibility with Vue called framework7-vue, but unlike Vue and Framework7, it cannot be developed using frontend integration. It has to be written in Node.js in a backend like fashion and compiled to its frontend files.
For a moment I felt defeated that I had a new obstacle standing in my way to completion. I had never used this technology before, or at least not thoroughly, and my only way out of this was to actually learn it. Now, Framework7 also offers integration with ReactJS, which is a very big buzz word in the software development industry and a good technology to have on your toolbelt. I had a second where I thought, if I have to really learn a whole new technology, do I want to just learn React now? I took some time to compare the pros and cons of learning React versus Vue, asked the community, and ultimately made the call to continue with Vue. What my findings were is that though React is a more comprehensive technology, it has a steeper learning curve, and I was already a little into Vue as it stood, and Vue had enough similarities to AngularJS, in which I was already well versed. All of these decisions I made continued to be based on how to get a working product done the soonest.
So, I followed the tutorials, got a framework7-vue project set up, arbitrarily picked webkit over browserify as my JavaScript compiler (I think I had used webkit once very briefly for a proof of concept at work, so at least I knew it worked?), and got to coding. Thanks to Google and the Framework7, Vue, and webkit communities online, I was able to get right down to business.
Front end, here we come!
Once I committed to building my frontend specifically with framework7-vue, I first converted all of my already written frontend code into pages and components. Pages are specific to Framework7 as a UI framework, but components are how Vue organizes different reusable code blocks. A Vue component has a .vue file extension (rather than .html or .js) because it becomes a self-contained unit that defines layout, look and feel, and behavior. As a result, a .vue file has a template, style, and script section within:
<<mark style="background-color:rgba(0, 0, 0, 0)" class="has-inline-color has-colibri-color-3-color">template</mark>>
    <mark style="background-color:rgba(0, 0, 0, 0);color:#ababab" class="has-inline-color"><!-- HTML code goes here, as well as references to other
        Vue components, which are referenced using a custom tag --></mark>
</<mark style="background-color:rgba(0, 0, 0, 0)" class="has-inline-color has-colibri-color-3-color">template</mark>>
<<mark style="background-color:rgba(0, 0, 0, 0)" class="has-inline-color has-colibri-color-3-color">style</mark>>
    <mark style="background-color:rgba(0, 0, 0, 0);color:#ababab" class="has-inline-color">/* CSS-type (or less or sass if you want) style declarations go here */</mark>
</<mark style="background-color:rgba(0, 0, 0, 0)" class="has-inline-color has-colibri-color-3-color">style</mark>>
<<mark style="background-color:rgba(0, 0, 0, 0)" class="has-inline-color has-colibri-color-3-color">script</mark>>
    <mark style="background-color:rgba(0, 0, 0, 0);color:#ababab" class="has-inline-color">// Control and event code goes here, like when happens when the
    // component first renders, when it gets clicked, etc.</mark>
</<mark style="background-color:rgba(0, 0, 0, 0)" class="has-inline-color has-colibri-color-3-color">script</mark>>
This makes component maintenance much simpler than having to define layout, behavior, and style in three different places, as you may have to do when strictly writing frontend code. React has a heavy overlap with this concept, which is one of the reasons it too is such a popular technology.
One of the biggest advantages of using webkit (as well as browserify) is its ability to hot reload as code changes are made and saved. Webkit does compile a set of JavaScript, HTML, and CSS resources that can be consumed by a frontend browser, but during development it acts as a self-contained webserver that automatically pushes changes as they are saved. This saves you from having to recompile everything each time a code change is made. And man, is that a time saver! I would just hit Control+S in VSCode and then reload the page in my browser and my change was right there!
Now that I had committed to pages and components, and had rewritten my frontend-only code into this style, it was time to start picking one feature at a time and knocking it out. When I was writing the backend API code, after I had established the core of the project, I made a list of API routes and coded them one by one until they were done. Similarly for the frontend, now that the core was done, I made a list of features, and went through them one by one.
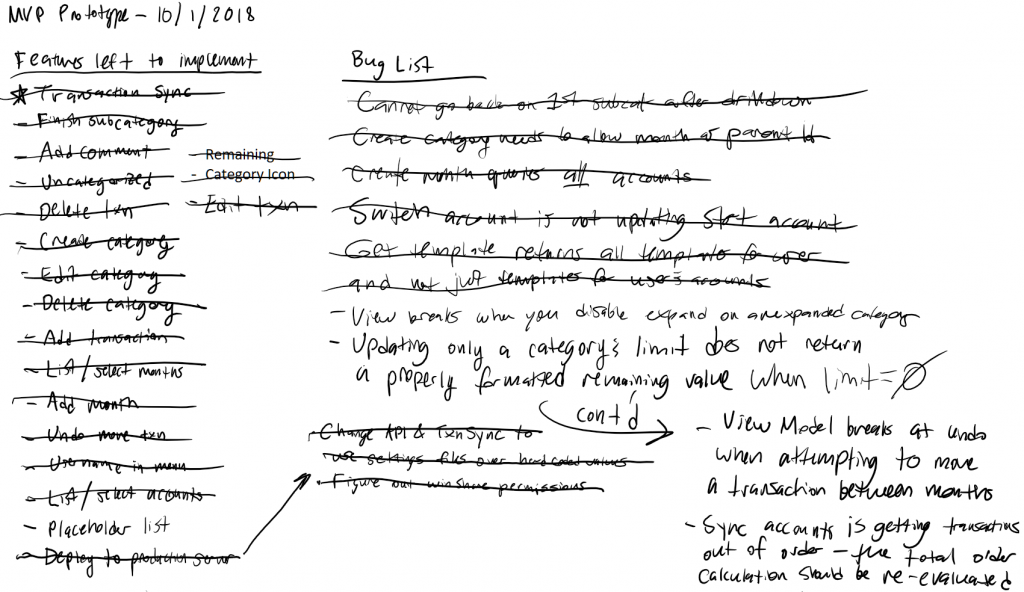
Above is a snapshot of my design page in OneNote with all of my features crossed off (all but one). Because I have an ADHD brain, I relied on and required this list to be productive. Without this list, I may have bounced back and forth between features ad nauseam. This helped me stay on task, and I wouldn’t let myself move onto the next feature until the previous one was done. And as I got them done, I crossed them off the list.
You will also see I had a running Bug List too. Anybody who has ever programmed anything knows that this is a natural part of the process. Bugs will come up, and they need to be squashed…eventually. When you’re developing a new feature, especially in greenfield development like I was in, having to fix a bug is not nearly as appealing. I think I ended up saving a lot of the bugs until after most of the features had been developed, but I definitely had to deal with bugs that were showstoppers that would prevent me from developing the features on the list. In the end I fixed most of the bugs, but there was one on the list that I never got to and just decided that I won’t do that one thing that makes it go breaky-breaky.
Because I had completed every route in the backend that I would need, I was able to stay in frontend mode for almost the entire duration of frontend development. One of the bugs listed, “Updating only a category’s limit does not return a properly formatted remaining value when limit = 0,” required me to go back to the backend and fix a mistake I hadn’t caught when manually unit testing my routes. OK, so I got like 95% of the backend operating correctly with manual unit testing. To me that is great, especially because I saved myself the expense of writing automated unit tests. It was a gamble that I’d say paid off.
As I developed features, I was able to start actually using the app to do my budgeting and transaction categorizing. By September of last year (2018), I had developed about one third of the features from the list. For every feature that hadn’t yet been developed by that point, I was able to just make a direct API call to get the behavior I needed. As the app got more and more complete, I was able to evaluate the adequacy of my design and whether or not it worked the way I had hoped. In general it did exactly what I had hoped it would do. But I realized there was one feature I didn’t include in my design that I knew I needed.
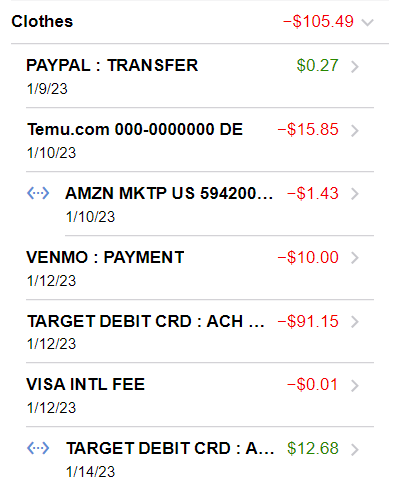
When the app synchronized transactions with my bank, they would all be loaded into an “Uncategorized” category. When in that category, I could see them in the order they appeared in my online bank statement. However, once I categorized them into their different categories, I lost all sense of the original order of each transaction. This became confusing for me, and especially when I wanted to see the order in which transactions cleared my bank, I would have to leave the app, log back into my bank, and see it there on the statement. I realized I needed that capability within the app. so I quickly drafted up what that view would look like and took a short detour on my development path to implement it.
I called this the Ledger view, and it was a simple concept. Just show all transactions in the order they were stored in the database, which is also the order they cleared my bank according to my bank statement. What was an interesting challenge with this was that this view originally attempted to render every single transaction, and that nearly broke the app. I had to employ lazy rendering, or a virtual list as Framework7 calls it, so it wouldn’t attempt to render hundreds of transactions (maybe over one thousand) in the view.
The last thing I had to implement, after all of the features were crossed off and all of the bugs were squashed, was the daily transaction synchronization feature. This one was put off till the end because it technically happens outside of both the frontend and the backend API. It happens on a schedule, and though I made a way to manually trigger a transaction sync outside of the regular schedule, I kept the synchronization portion separate from everything else. But, um, how do you automatically read all your transactions from the bank? Up until now, I was manually downloading my transactions and running them through a script to load them into the database.
I was positive that I wasn’t the first person to have this question, so I searched the web a bit. I came across Yodlee, which seemed to have the most attention given to it as a solution to this problem, but what was a more attractive solution was a technology called Plaid. What gave Plaid the advantage is that it is already set up like an API and even already had a Node module for integration into my Node.js codebase. On top of that, getting it setup was super simple! It is worth noting that none of these technologies are actually free – they are professional products that require you to buy in. But with Plaid, you do get a small number of developer accounts that can be used minimally. This suited my purpose.
Look what I just built!
In my very own field of green, I now had something I had built with my own hands! I deployed my backend API code, I set up a reverse proxy from my web server for the API, I compiled my frontend into assets, served those all in a static directory, installed the SSL certificate and put everything (except for a landing home page I built) behind basic HTTP authentication, set up the transaction sync on a cron job, and let it loose.
In iOS, from the Safari browser, you can save a page as a shortcut to your home screen and it will appear as if it were just another app. If you configure it correctly, then the icon it assigns to your shortcut is your custom icon, and when you open the shortcut, it takes up the entire phone screen (and does not show the navigation bar at the top). For all intents and purposes, it behaves like any other app on the phone, without ever having to go through the iOS or Android app development tools or processes.
By November of last year (2018), I had wrapped up development of the budgeting app and was using it regularly. And let me tell you, once it was done, it was nice to finally get some sleep again. (At least for a bit. Christmas came up soon after, and getting ready for that had me up at night quite a bit.) I ended up naming the app BudgetCat because it was the categorized budgeting app, and it seemed fitting to draw a little mascot in MS Paint.
Fortunately for me the bugs have been few. Also fortunately for me, it does exactly what I set out to do with it. I think that’s the biggest thing that makes going through this entire process worth it. Even though I was heavily sleep deprived through this process, I got to draft my very own design based on my user needs with which I was very familiar, choose all of the technologies to fit my needs, learn new technologies when necessary, and then put it all together and build it. It was cool while I was doing it, and it is still really cool to look back on it and see what I was able to accomplish.
No responses yet